I've now got a working temp control for the pre-heater element. It does switch on and heat up to well beyond where I want it to, and then it recognizes it has over shot and it turns off. Then once under temp again, it will switch back on. So I have some progress there.
It was only at the end of the day when I got this far and had already switched off my computer so I'll have to start over tomorrow with the RasPi and reset it to a default install. Then I can reload the Arduino and Teensy stuff on it and then go again with trying to adjust my program. I was updating the program on my laptop and then trying to test, which wasn't working out. I didn't find this out 100% until I had plugged the teensy back into the RasPi and everything worked as it should had.
I also adjusted the dip switches on the back of my tach so it'll be good to see if that has corrected my tach output now. Would be nice to see a normal idle showing on the tach, instead of it claiming to be 250 rpm. :-)
So maybe tomorrow I can set the temp much higher than where I have it now and add a couple of features, where it will be easier to tell what the temp is and maybe even an easy way to set the temp instead of using a computer to set it. May be getting ahead of myself there.
I'm just glad to be over the hump to where I know have an automated means for controlling the power to the heating element and it will regulate the temp within some margin. Now I can focus on figuring out what that temp should be and automating more of the processes that it takes to make this as easy to use as a normal fuel injected car is.
Thanks,
Coop
Sunday, March 5, 2017

Wednesday, March 1, 2017
Mar 1 - one program away
I've got the last of the physical install stuff done for the next iteration of the fumes testing. I've got the solid state relay installed. It is controlling the power line to the heating element being allowed to connect or not. It has a 5v turn on that is micro-controller switched based on the temperature it sees in the box and being mounted up against the element itself. This will avoid the element reaching a temp high enough to have any more small explosions in the box.
Here's the solid state relay.

Here's the solid state relay.

Control is on the bottom, the power line I spliced into is on the top. I'm repurposing the same setup that was going to watch the larger vaporizer box with and control the vacuum to the EGR, is now being used here instead. I think being 100% electrical I can be more accurate in the temp control. We'll see.
It takes a little longer to warm up, but allows me to save more fuel on cold starts than it would have in the other method. I plan to put some sort of gauge to see the temp at all times. I'm thinking because it is already run by the teensy, that I could run a servo that has a hand on it and make my own gauge to watch. Easier to know the actual temp for cold starts. That would be nice to know over having just an LED. That was my original idea, I was going to light an LED with an icon in front of it that looks like the glow plug warming coil icon that Diesels use when they cold start. I'd rather have the gauge and know the actual temps.
Thanks for your time. Hopefully this will inspire others to do similar stuff.
Take care,
Coop
Sunday, February 26, 2017
Feb 26 - finish up that breath
I closed up the intake tube today. I got the slot cut out to allow the heating element to exit from inside the elbow. I got the clamps on it. Repositioned the air filter so it can get fresh air from outside.
I thought I would show what the element looks like up inside the elbow once it is ready to go before I add the other bits where it blocks the view of the one tie wrap I use to hole the element in place. I've got a hole drilled into one end of the elbow so I can run a tie wrap through that to pull the element to the one end. That makes the back end set its location so it can't be moving around in there once set with the cap on the top.
Then I added a piece of foam rubber with electrical tape wrapped around it (to stop the flaky bits from getting sucked into the motor itself). I have a stainless steel tie wrap on that as well. there are multiple pictures so I can try to get enough angles to make sense of what you can see. When you see the 2.25" pipe doing a 180 up near the camera view, you're looking down through the quarter window behind the passenger's door, to see that view.


I thought I would show what the element looks like up inside the elbow once it is ready to go before I add the other bits where it blocks the view of the one tie wrap I use to hole the element in place. I've got a hole drilled into one end of the elbow so I can run a tie wrap through that to pull the element to the one end. That makes the back end set its location so it can't be moving around in there once set with the cap on the top.
Then I added a piece of foam rubber with electrical tape wrapped around it (to stop the flaky bits from getting sucked into the motor itself). I have a stainless steel tie wrap on that as well. there are multiple pictures so I can try to get enough angles to make sense of what you can see. When you see the 2.25" pipe doing a 180 up near the camera view, you're looking down through the quarter window behind the passenger's door, to see that view.
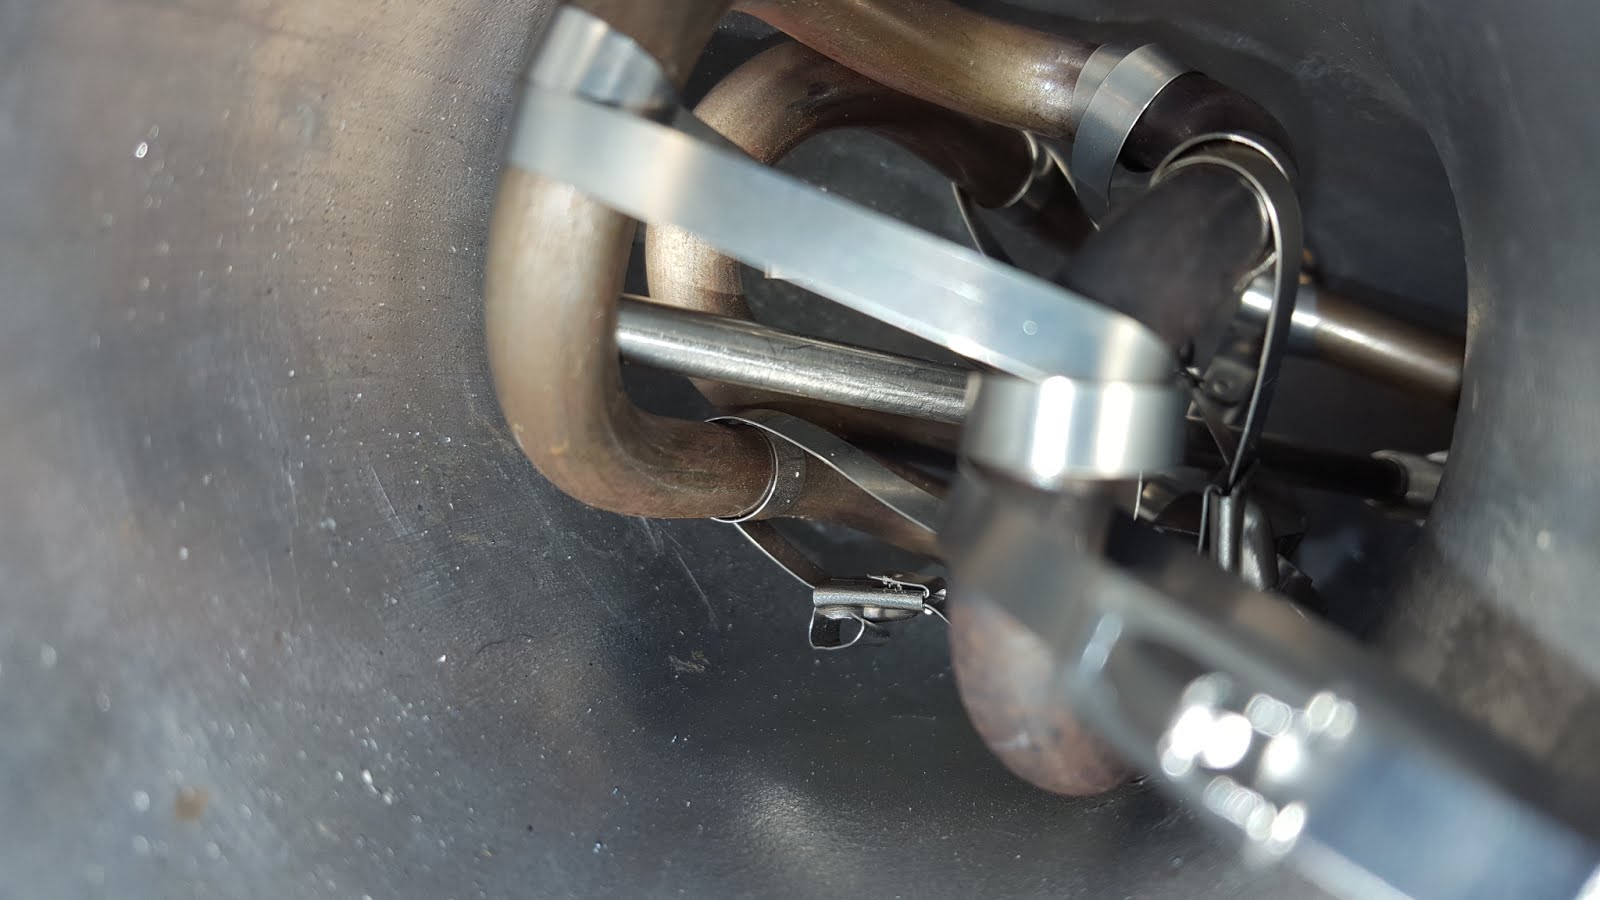 |
| Can also see the temp probe touching on the back of this 180 bend at the bottom. Which appears on the left in this image. |
 |
| Can see the opening in between the heat elements leads. |


Friday, February 24, 2017
Feb 24 - proper breathing
So today I spent most of it trying to fab up a first run of what I want to do for my naturally aspirated hot fumes car. I needed to make an adapter to go from a 3" intake to a 2 1/4" pipe but offset it in such a way as to make room for the heating element to exit the 3" elbow it sits inside of.
I've got some pics here that show the process as I was trying to keep up with the various steps as I went along. People can comment on here if they would like more details about this piece. If this isn't all going together for you, I'm sure it will once you see what comes next.


I've got some pics here that show the process as I was trying to keep up with the various steps as I went along. People can comment on here if they would like more details about this piece. If this isn't all going together for you, I'm sure it will once you see what comes next.


 |
| Adapter is mounted on the bottom of the 3" elbow. |
 |
| I will cut holes and slit the vertical on the adapter to allow the heating element and K-Type thermocouple to exit this piece. |
 |
| Looking down from the top. |
 |
| Looking Back from the Front. |
 |
| Looking from right in front of the rear tire. |
Saturday, February 18, 2017
Feb 18 - passenger seat
Here's how I did my passenger seat in my Diablo kit. I've got a good update on the video that describes it well. Here are a couple of pictures from the rails modification that I made. I took about a half inch out of the height in the back of the rail. The front is pretty much flush. I did trim some of the diameter away from the rear outboard rail, the inboard rail fit without any trimming needing to be done other than the height change.
In one pic I have measurements written on the shell itself. Others show various stages of completeness.


And the Video update itself can be found here:
In one pic I have measurements written on the shell itself. Others show various stages of completeness.


And the Video update itself can be found here:
Thursday, February 9, 2017
Feb 9 - Coop. Keeping it real
So today I got my son out to help me with another test drive in the Lambo. My bright idea was to have him manually switch the power off and on to the heating element to try and regulate the heat to some extent. You know what? People have a good ear for things if they're tuned into them. We let the heating unit run for a minute to a minute and a half and then tried to crank the car.
It was 48 outside with a wind chill much colder than that and it fired right up. We let the car run for about 9 minutes so it was good and warm on the water temp. Shut it off and then I started to make the video you can now see on youtube.
This video needs some explanation though. There is a bit in the description but it doesn't do some things justice that occurred. Something you can't see on the video is how rich I got the thing. I actually flooded it!!! I have done this on the go-kart before. Got the fumes so hot and rich that I didn't have enough air and I killed the motor.
So once I could finally get it to start up again, I had it rolling the smoke from being rich. I shut my injector off and drove back up the hill (driveway) and into the road. After I was up there it finally acted like it wanted to stumble and I added the injector back on! Wow! You know how much fumes it had to make from that small puddle of fuel it had to back all the way up the hill? Amazing!
As usual you can hear the brake dragging. I hadn't figured that out yet. Sorry. Gotta deal with it on my videos until I get that sorted. Sorry too that the phone fell under my seat but you can still everything going on in the video and the commentary at the end.
Thanks for watching. I hope this is as exciting to watch as it is for me to make the history of making it happen (all over again)! :-D I don't mean this specific video, but the series of what it takes to make this happen! I'm sure I'll eventually get a turbo and do the Smokey thing totally, but this baby step to getting there is a great lesson and fun thing to do. Just driving on one injector normally aspirated is fun as all hell. :-D Enjoy!
It was 48 outside with a wind chill much colder than that and it fired right up. We let the car run for about 9 minutes so it was good and warm on the water temp. Shut it off and then I started to make the video you can now see on youtube.
This video needs some explanation though. There is a bit in the description but it doesn't do some things justice that occurred. Something you can't see on the video is how rich I got the thing. I actually flooded it!!! I have done this on the go-kart before. Got the fumes so hot and rich that I didn't have enough air and I killed the motor.
So once I could finally get it to start up again, I had it rolling the smoke from being rich. I shut my injector off and drove back up the hill (driveway) and into the road. After I was up there it finally acted like it wanted to stumble and I added the injector back on! Wow! You know how much fumes it had to make from that small puddle of fuel it had to back all the way up the hill? Amazing!
As usual you can hear the brake dragging. I hadn't figured that out yet. Sorry. Gotta deal with it on my videos until I get that sorted. Sorry too that the phone fell under my seat but you can still everything going on in the video and the commentary at the end.
Thanks for watching. I hope this is as exciting to watch as it is for me to make the history of making it happen (all over again)! :-D I don't mean this specific video, but the series of what it takes to make this happen! I'm sure I'll eventually get a turbo and do the Smokey thing totally, but this baby step to getting there is a great lesson and fun thing to do. Just driving on one injector normally aspirated is fun as all hell. :-D Enjoy!
Wednesday, February 8, 2017
Feb 8 - fails are learning devices
So I found out that it takes about 2 mins for my charcoal heating element to get hot enough to explode a gasoline puddle. :-D
So here's my heating element. I bent it up tightly to fit inside the 90 degree elbow. I have multiple views so you can see all of the stainless steel ties that I used to make a web for helping to heat the air and make it behave more like a heat exchanger, instead of the element itself getting really hot and not mixing that with the incoming air.


In the youtube video you can see the make shift air filter blow out and hear the pop noise from the small explosion. I did drive the car right after this, I just turned the heat off and drove like I used to. The new thing being that I have is the heat from the water in the engine block that I am spraying against, so I was able to keep the injector turned down from where I used to have to keep it when it was ambient temps only.
So here's my heating element. I bent it up tightly to fit inside the 90 degree elbow. I have multiple views so you can see all of the stainless steel ties that I used to make a web for helping to heat the air and make it behave more like a heat exchanger, instead of the element itself getting really hot and not mixing that with the incoming air.


Then of course I drilled a hole into the 90 and allowed one tie to hold that heating element in the elbow pretty well. So it isn't moving around so much while driving.


In this last pic you can see the inverter and the intake elbow. I've got a solid state relay that I will be using to power the element on and off in a slow pulse fashion to keep heat temps up but not too high to avoid another loud noise again. :-)

In the youtube video you can see the make shift air filter blow out and hear the pop noise from the small explosion. I did drive the car right after this, I just turned the heat off and drove like I used to. The new thing being that I have is the heat from the water in the engine block that I am spraying against, so I was able to keep the injector turned down from where I used to have to keep it when it was ambient temps only.
Subscribe to:
Posts (Atom)