Saturday, August 27, 2016

Aug 20 - begins the long journey

So in respect for everyone's time, I'll cut to the chase.  If you have these boxes.  Cut them in half on the line that looks like it could be used to cut them in half on.  Save yourself the time of trying to make these work with them together as they come.  The front bit will allow for a nice curvature into the duct hole on the quarter panel and the rear bit will be to box in your radiator and keep it in the right location far enough back that you don't have a problem putting the body back on once it has the boxes installed into them.

I've hacked mine all to hell trying to get them to fit as-is.  Don't waste your time.  I had a guy who has built a dozen or twenty of these same model cars and he said they always cut theirs.  Now the reason he gave me at the time didn't make any sense to me so I wasn't going to cut mine.  Truth is, regardless that he didn't remember why they did it, the point was to cut them so they're easier to install.  And makes everything fit well.  I should have cut mine.  I will be cutting mine now and I think I can do this with them installed into the body and the body fitted to the frame.  These pics look better than the final product because you don't see it installed onto the body.  It's currently a mess.  I'll shoot pics before I tear into it.  So you can see how bad things got.  I guess I'm glad I screwed up my mix and made it without enough hardener  Because I would have been cutting them out had they setup properly.

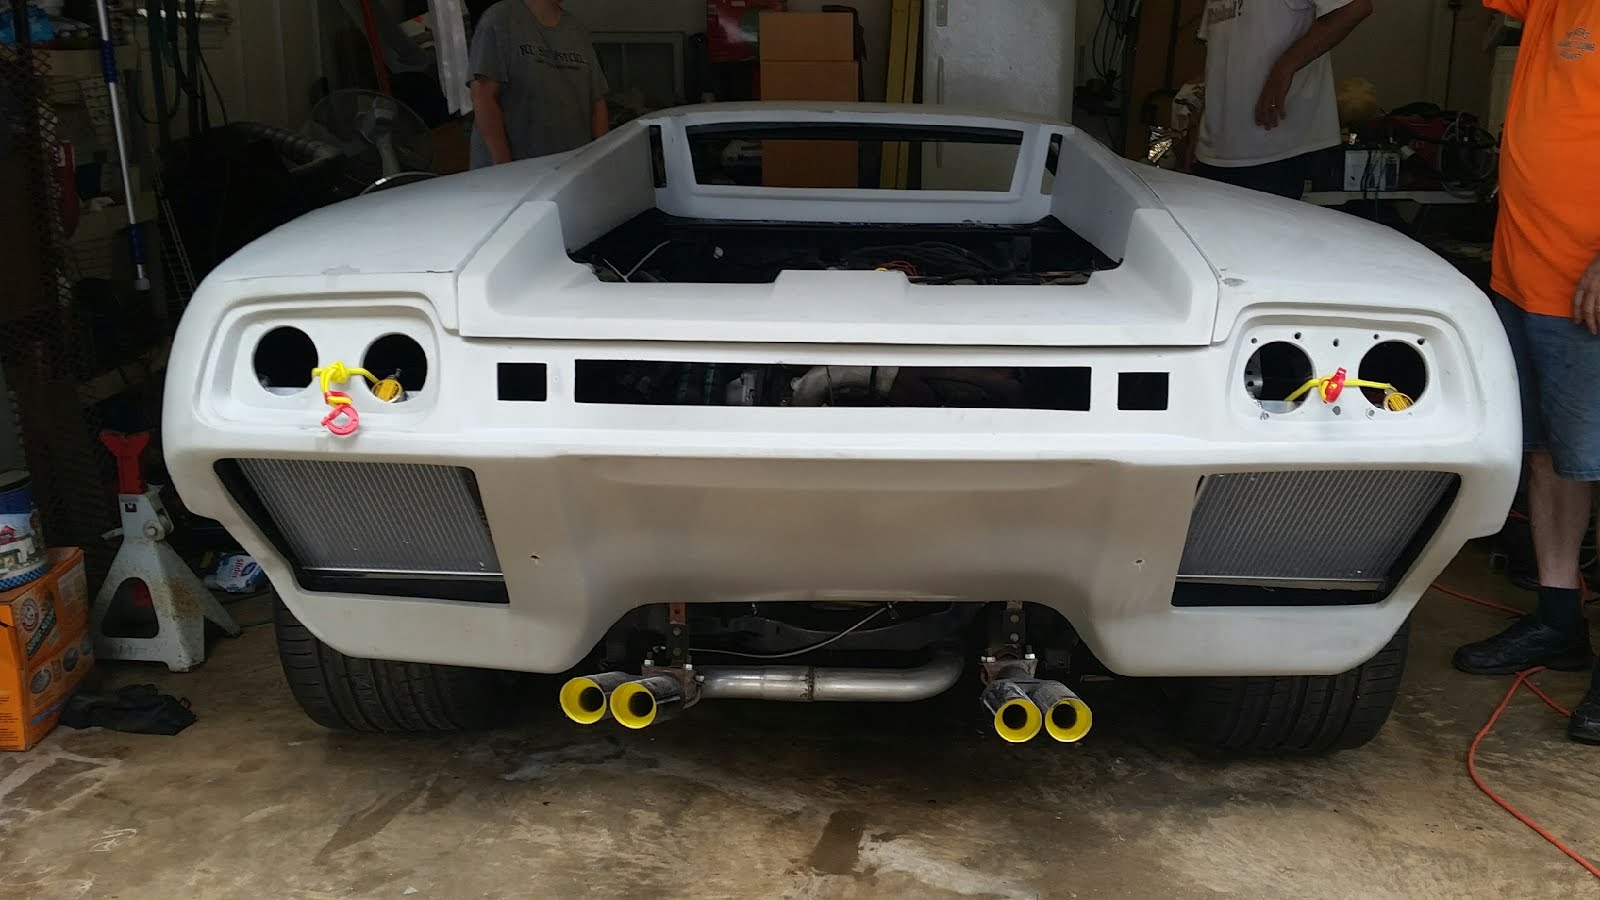
The pictures I have here are all of the progress on the way up to where I am now.  I made the screens in front of the radiators an integral part of mounting the radiators to the boxes.  You'll see  where I welded washers (doubled them up) to the screens to make them mounting points for the radiators. And then of course the screens are also screwed to the boxes.

Another tip, don't ever mix large batches of fiberglass at once (unless this is your day job and you know how to get the hardener just right), keep the smaller more manageable batches going and just pick up where you left off as you go along.

Here are the pics.

Roughing up the glass to put it in.

Instead of doing another post about the taillight bezels...
In short I took them to Jerry Noone of Noone customs and he drilled holes in them and counter sunk my 2 screws into them and used a hot set structural epoxy type of stuff to adhere them in. (100EZ its called)  They're not going anywhere.  I used stainless 1/4-20 phillips head screws.  Ground the tops of them down flat and dropped them into the holes.  Then backed them with washers and nuts.  I drilled the body and pulled them through with nuts on the body.  Cleaned up the holes in the bezels with some body filler and primer.

Tuesday, August 16, 2016

Aug 16 - maybe this will help

I have some pics that I haven't taken before now.  They are the ones that complete the shape of the ducts in a way that forces more of the air into the radiators.  You still have to add baffles around what you have to make sure no recirculation goes on, but that's not going to be a real issue once I'm done with these.  I have some weather striping for the sides of the radiator itself and a small piece I'll add in to block the air on the front from being able to bypass the radiator and go to the rear of it.  Only at the very top is there an opportunity for that to happen and not a very large one.


Aug 15 - right tool - right job

When only the right tool can yield that perfect radius that you're looking for.


Yes, that is what it looks like.  I used the log to form the radius onto the expanded metal mesh for making the screen to block rocks from hitting the radiator from the rear tire.  :-)


And after careful consideration, I'll be hunting a couple of thick washers that I will weld to the mesh.  Then the radiator itself will bolt to the mesh and become a structural member to holding the radiator.  There are 2 each 1/4-20 screws with fenders washers on the fiberglass and the mesh holding it to the duct.

After this is altogether and in the car, I'll check the performance out.  If I like it, then I'll pull it from the car and clean it up and hit it with the POR.  I could always add a smaller/tighter mesh if it lets in too large of an object.  I think the angle things will be coming into this screen will be high enough of an attack angle that it will suffice.  Time will tell.

But these screens cleaned up nicely with the grinder and don't look bad at all.  I rough cut them with my plasma cutter and then cleaned them up with a cut off disc and flapper wheel.

Sunday, August 14, 2016

Aug 14 - fan shroud mounts are on

So I was figuring out the best way to use what I already have and in this case I have my 95TA fans that have their own shrouds; and a pretty easy method for making load bearing mounts.  I measured where the pin at the top of the radiator is in reference to the edge of the radiator itself (top cap) so I can pull the shroud right up against that spot.  And where in elevation to hang the radiator fan shroud to make sure it can cover the most of the area to draw air through the fan.  So as is typical of something that is elegant, when you see it, it looks like a simple thing.  That there couldn't be much engineering in it for it to be the way that it is.  And sometimes you just get lucky in that it is easy to make as well.

I got a little of both this time around.  I got something that was pretty straight forward and yet is considering a lot of different elements in its design at the same time.  I'll let the simple pictures tell the rest of the story.  For those that get it, they'll like the simplicity that it turned out to be; and for those that don't get it, don't worry, it really is as simple as it looks, its just got a lot more thought in it than you may think.  :-)

The pin that sits at the top center of the radiator.  This is where I will hang the weight of the fan and shroud from.

My first one I assembled, it was late and the lighting wasn't good.  I didn't take pictures of the process until the next day when I did the next one.  You'll see differences in the two and they're there for a reason.


The next one.  As I built it.
The plate itself is tapped 10-24 and screws run through it, then a nylon lock nut is applied to lock that thread from vibration taking it out.

Saturday, August 13, 2016

Aug 13 - not 48 hours later

I'm back out there, getting after it again.  I'm just so excited that I'm seeing it about to be drivable, I can't stay away from it.  :-)

I've got the wife to help set the engine cover on.  I blocked up a couple of 2x4's and one 2x6 to hold the center up properly.  I've got the hinges screwed in to the body so I can lift the engine cover.  After that I was testing out the alignment of the 3rd brake light.  Which looks like it will go in on this next body pull. 

So Monday the body will come off (hopefully for the last time) and I will get the engine cover mounted/aligned better to stay.  The 3rd brake light will get it's mounting holes on the engine cover drilled and have that unit screwed on.  And last but not least I will get the air ducts mounted in kitty hair into the body for good.  Final radiator mounts will go in and the next time the body goes on I will plumb it for water to be added to the motor.

Tomorrow will have an update on the radiator fan mounts that I have come up with.  I did get one 50% done tonight, but will wait for tomorrow's update to show the pictures of what that looks like.  It is using what is already there to be a good mount point to hang the weight of the fan unit onto.  The rest of the mounting will only to better secure it from moving around and not really be weight bearing.

So here are some pics of the engine cover on for trial fit and the 3rd brake light looks like it will be right at home once mounted.


Aug 11 - physical bug not a software bug

I've got a couple of pictures of the progress I was making this night, before a bug decided it wanted to live beyond my eyelid.  Here's an excerpt from the email I sent my buddies describing to them what happened.

I fell. I got up. But landed hard. Was last night. Went to see the back cracker this morning. Said I knocked my pelvis out of alignment. 

I was working on the car and a bug flew into my eye. I was digging it out and he was trying to dig in to get away from me. I held one finger on the eye while I was making a bee line to the bathroom to flush it out with water. As I ran through the utility room,  I tried to hop over the baby gate at that doorway. I caught my ankle on the top of it but had too much momentum to stop. So I tried a double hop thing but went over the top and landed hard on the floor in the kitchen.

I got up right away as my eye was killing me and went to flush it out. T dug it out, what she could, still feels like something is in there. But was already feeling it,  the fall. My whole left side landed like a sack of potatoes. Forearm,  knee,  shoulder are the worst. 

But before that drama, I did find the proper way these Acura Integra radiators belong in my D&R rear ducts.


This is the expanded metal I'm going to use to screen off rocks and things from hitting my radiators as they're right behind the rear wheel there.  The holes are big enough for my pinky finger to go in to the first knuckle.  Should flow plenty of air still.

Wednesday, August 10, 2016

Aug 10 - Engine cover rough cuts

I took a minute from regular work today to do something that has been nagging at me that needed done.  I did the rough cuts for the engine cover so it looks a little more like it will later on.  I don't think it was too bad for some vibrating cutter and dremel work.  I probably spent about 3 to 4 hours on it in total today.


Aug 8 - Test mounting on car

We got our first chance to have some help over in a while, so I took advantage of it.  I got folks to help lift the body to set it on the frame and check out if my radiator fitments would work out or not.  After having it on, off and on again, it looks like not.  But we are SO close!  Less than an inch.  I'd say about 5/8" is all that we lack in getting it on the money.  But the body needed to come forward that much and it didn't, so it's back to finding that last little bit some place.  I've got those air ducts hitting the frame (as they should do) but they're not 100% in place where they should be.  I also probably need to see if I can mount my radiators vertically inside the ducts, this would make more room all around, not just for the body but for the tail lights to land in their holes and me not need a robotic tool to replace my lamps in the future.  Also it would help with being able to reach in there and remove the radiator cap, if it would ever need to be done.

I managed to get the one bungee cord to hold the radiator and the duct all in one go.  You'll see the bright yellow cord in the bottom most pic.